Proxmox: bind mountpoint from host to unprivileged LXC container

Introduction ⌗
Bind mounting refers to a type of mounting in Unix/Linux/Posix systems where a directory is mounted on top of another directory. This is accomplished by using the mount command with the --bind parameter, for example:
mkdir ~/new_documents
mount --bind ~/Documents /new_documents
When using LXC containers for virtualization, the guest system runs on the same kernel as the host system, meaning we can bind-mount directories from the host to a guest container. Mounting a host directory to a path inside a guest container is a great way to:
- Share data between multiple containers
- Share data between the host and the container
- Give storage access to containers without resorting to using network shares
- Give containers space to store stuff without creating virtual disk images
Using bind-mounts, you can, for example, create a ZFS pool on Proxmox, and bind a directory in said pool to a Turnkey Linux Nextcloud container to use for storing user data, or to a Turnkey Linux Fileserver to share the storage using SAMBA or NFS. You could also spin up multiple Nginx or Apache containers, store your website data from each container segregated on multiple host directories, but be able to back them all up as one dataset.
If you’re reading this, you’ve likely got Proxmox running, you’ve created a ZFS pool, spun up some LXC containers, and then got stuck doing something of the sort that’s described above. Maybe you’ve looked around online and tried a few suggestions, but your storage sharing is still not working. That’s where this guide comes in - hopefully the info provided here will help you fix your issues.
Disclaimer ⌗
The material and information contained on this website is for general information purposes only. The author is neither an expert in system administration, nor in cyber security, and is not liable for any loss of data, security breaches, early terminations of job contracts, explosions of production servers, sudden unexplained death of datacenter engineers, nuclear wars, or for anything else that may result due to the reader using the information provided here. Any reliance you place on this material is strictly at your own risk.
Seriously… Please make sure to do your own research before relying on random suggestions that you find on the internet.
The problem ⌗
By default, (meaning, unless you EXPLICITLY select otherwise), newly created Proxmox containers are of the Unprivileged variety, as can be seen in Figure 1.
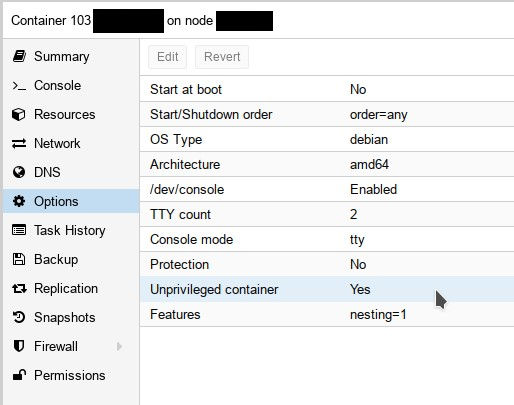 Fig. 1: Unprivileged container options
An unprivileged container is the safest type of LXC container, because the root user ID 0 inside the container (as well as other user and group ID’s) are mapped to unprivileged user ID’s on the host (typically starting at 100000 and growing upwards). As a result, in the absolute worst case where an attacker may break out of the container and get access to the host, he would find himself with no rights to actually do anything harmful.
Naturally, this security advantage comes at a cost. Thankfully, this doesn’t (to the best of my knowledge) impact performance, however as you are likely already aware, using an unprivileged container brings about various configuration complexities, one of which is getting proper read/write access permissions to host bind mounts.
NOTE: If you don’t care about using secure unprivileged containers, for example if you’re messing around in your home lab and just want to “get things going”, you can create a privileged container instead as seen in Figure 2, and set up a mountpoint as described further down without any additional configuration. THIS IS NOT SECURE and should never ever EVER be used in a production environment unless you 100% understand and accept the security implications.
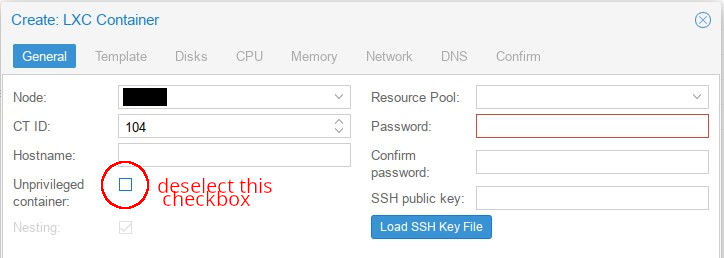 Fig. 2: Privileged container creation (UNSAFE! don't use unless you really know what you're doing!)
Possible solutions ⌗
There are two possible solutions for allowing read/write access to a bind mounted host directory from a LXC container.
The first option is to keep the default UID/GID mapping that Proxmox LXC uses (ID on host = ID on guest + 100000) and create a user/group on the host with the specific UID/GID that matches what is mapped from the guest, and giving the group the desired permissions to the mount point on the host. This can be seen in Figure 4.
 Fig. 3: UID/GID of 1000 on the guest container is automatically mapped to 101000 on the guest by default, and the permissions of the folder to be bind mounted are set accordingly
Secondly, it is possible to change the guest-to-host mapping of the LXC user/group ID’s to a specific user/group with the desired permissions on the host; this is seen in Figure 4.
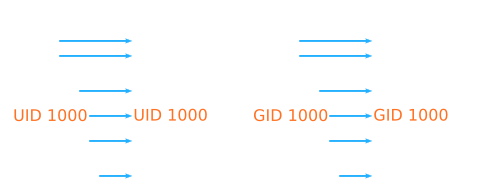 Fig. 4: Mapping a single LXC GID/UID pair to host
The next sections will discuss how to set up a bind mount point inside the container with both of the methods described above.
Method 1: Set host directory ownership to a high-mapped container UID/GID ⌗
CHOOSE THIS METHOD to quickly get what you need.
BE AWARE that this setup might become confusing at scale due to differing data ownership user/group ID’s between the host and the guest.
Using this method, we will only change the ownership of the host data directory to allow access from the container.
We assume that the desired host path to be mounted on the guest is /mnt/my-data-pool. The aforementioned path will be mounted at /mnt/host-data inside the guest. Additionally, the container ID that we will be operating on is assumed to be 101.
Configuration in the host ⌗
As mentioned before, by default, the LXC mapping of guest UID’s/GID’s in the host is as follows:
Host UID/GID = Guest UID/GID + 100000
For example, we know that on a Linux system, the root UID/GID is 0:0. This would get mapped by LXC to 100000:1000000 in the host. Likewise, 1000:1000 would get mapped to 101000:101000, and so on.
So effectively, all you need to do in the host to allow access from the guest, is to change the ownership of the mount folder to a high-mapped host UID/GID that belongs to the user in the guest.
For example, to give the root user inside the guest ownership of the /mnt/my-data-pool in the host, you simply set the ownership of the path to the high-mapped UID/GID of 100000:100000:
chmod 100000:100000 /mnt/my-data-pool -R
The same can be applied for a user who’s UID/GID inside the guest is 1000:1000:
chmod 101000:101000 /mnt/my-data-pool -R
Finally, once the ownership is set to the desired mapped UID/GID on the host, we modify the container configuration by adding our desired mountpoint. By default, the configuration for a container with ID 101 would be found at /etc/pve/lxc/101.conf, and would look similar to this:
arch: amd64
cores: 1
features: nesting=1
hostname: debian-11-experiments
memory: 256
net0: name=eth0,bridge=vmbr0,firewall=1,gw=192.168.1.1,hwaddr=56:01:77:DD:C5:DB,ip=192.168.1.32/24,type=veth
ostype: debian
rootfs: ssd-local:101/vm-101-disk-0.raw,size=8G
swap: 512
To add our mountpoint, we append the following line at the end of the configuration:
mp0: /mnt/my-data-pool,mp=/mnt/host-data
Configuration in the guest ⌗
If the mounted directory has the ownership of 100000:100000 and you only care about accessing /mnt/host-data as root, then you’re done - the root user in the container can read/write/modify the contents of /mnt/host-data.
If you set a custom ownership, for example, 101000:101000, with the goal of giving access to a non-root user, then you need to create a user with the ID 1000. The following command below can be used to create a new user named host-data with UID/GID of 1000:1000:
useradd -u 1000 -m -s /usr/bin/bash host-data
The parameter -m creates a new /home/ directory for this user, and assigns the user’s default shell to bash. It will also automatically create a group with the same name and ID as the user.
Alternatively, to allow an existing user, for example, www-data, to access the data at /mnt/host-data, we can create a new group named host-data and assign it to said user:
addgroup --gid 1000 host-data
usermod -aG container-data www-data
Either way, with this setup a user with the ID 1000, or any user that is a member of the group host-data can now have access to /mnt/host-data.
Method 1 Pros ⌗
- Quick and easy configuration
- No messing with advanced LXC features (custom UID/GID) mapping
Method 1 Cons ⌗
- Doesn’t scale well and potentially messy to maintain: UID’s/GID’s differ between host and guest, which may lead to confusion and permission misconfiguration
Method 2: Changing the default LXC UID/GID mapping ⌗
CHOOSE THIS METHOD if you want to set identical owner UID’s/GID’s between the container and the host, or if you desire flexibility in how guest UID’s/GID’s are mapped into the host.
BE AWARE that if the guest gets compromised, the user/group with the ID’s mapped from the guest to the host also get compromised. This might be troublesome if the compromised user/group in question is used for more than just access to the mount point on the host.
Using this method, we will change the default LXC UID/GID mapping for a single UID/GID pair, to map to the same existing UID/GID pair on the host. We will specifically map the pair 1000:1000 to the same 1000:1000, and leave the all other container ID’s mapped with the offset of 100000 as per default, to facilitate security as described in the introduction.
We assume that the desired host path to be mounted on the guest is /mnt/my-data-pool. The aforementioned path will be mounted at /mnt/host-data inside the guest. Additionally, the container ID that we will be operating on is assumed to be 101.
Configuration in the host ⌗
Firstly, we change the ownership of the /mnt/my-data-pool folder to be 1000:1000.
chown 1000:1000 /mnt/my-data-pool -R
Next, we add root:1000:1 to /etc/subuid and /etc/subgid. This will permit the LXC daemon to use our desired uid/gid on the host (more info here).
echo "root:1000:1" >> /etc/subuid
echo "root:1000:1" >> /etc/subgid
Lastly, we need to modify the container configuration by adding our desired mountpoint and the custom mapping.
By default, the configuration for a container with ID 101 would be found at /etc/pve/lxc/101.conf, and would look similar to this:
arch: amd64
cores: 1
features: nesting=1
hostname: debian-11-experiments
memory: 256
net0: name=eth0,bridge=vmbr0,firewall=1,gw=192.168.1.1,hwaddr=56:01:77:DD:C5:DB,ip=192.168.1.32/24,type=veth
ostype: debian
rootfs: ssd-local:101/vm-101-disk-0.raw,size=8G
swap: 512
To add our mountpoint, we append the following line at the end of the configuration:
mp0: /mnt/my-data-pool,mp=/mnt/host-data
Additionally, we also append the custom LXC mapping information to the same configuration:
lxc.idmap: u 0 100000 1000
           g 0 100000 1000
           u 1000 1000 1
           g 1000 1000 1
           u 1001 101000 64535
           g 1001 101000 64535
The format of the lxc.idmap configuration lines are <u/g> <guest_start_id> <host_start_id> <num_of_ids_to_map>, where <u/g> selects whether the mapping is for user id’s or group id’s.
Below is an explanation of what each mapping combination does:
-
(u/g) 0 10000 1000- map 1000 ID’s starting from 0, to ID’s starting at 100000. This means that the ROOT UID/GID 0:0 on the guest will be mapped to 100000:100000 on the host, 1:1 will be mapped to 100001:1000001, and so on. -
(u/g) 1000 1000 1- map the UID/GID pair 1000:1000 to 1000:1000 on the host. The number1is there to specify we’re only mapping a single ID, and not a range. -
(u/g) 1001 101000 64535- map 64535 ID’s starting at 1001, to ID’s starting at 101000. This means that UID/GID pair 1001:1001 on the guest will be mapped to 101000:101000, 1002:1002 to 101001:101001, all the way to finally 65535:65535 to 165534:165534.
Configuration in the guest ⌗
Same as the guest configuration steps from Method 1
Method 2 Pros ⌗
- Posible identical UID/GID mapping between container and host, i.e. a user “John” with a UID of 3425 on the guest, can be mapped to a user “John” with the same UID 3425 on the host.
Method 2 Cons ⌗
- More complex configuration
- A compromised guest is potentially more dangerous compared to the previous method: if the user ID on the host is utilized for more than just accessing the shared data, then a compromised guest can theoretically mess with whatever the host user ID has access to.
Conclusion ⌗
Regardless of which method you applied, the users in your container should now be able to access the data in your host. Make sure to check the external links in the Additional reading section to build more knowledge about this subject.